How to Make a Sourdough Starter, According to the Experts
When I first encountered the idea of a sourdough starter, I was intrigued by the simplicity of the ingredients yet amazed by the complex life they create. Making a starter is more than just mixing flour and water—it’s about nurturing a living culture that evolves with time and care. This guide will walk you through the process, with insights from baking expert Zoë François, author of Zoë Bakes Cakes and host of the TV show Zoë Bakes.
Zoë François emphasizes that making a sourdough starter is both an art and a science. “Essentially, what we’re doing is combining flour and water and attracting the natural yeasts in the environment,” she explains. “That’s all a sourdough starter is.” While the process can take anywhere from a few days to two weeks, the key is patience and consistency.
What You Need for a Successful Sourdough Starter
Before you begin, you need to gather a few essential items. You can use organic all-purpose flour and filtered water. Zoë explains, “Use organic flour and use filtered water” because these ingredients ensure that no unwanted chemicals hinder the growth of natural yeast. Avoid using bleached or chemically treated flour and tap water that contains chlorine. Instead, opt for a clean environment that allows the natural yeast to thrive.
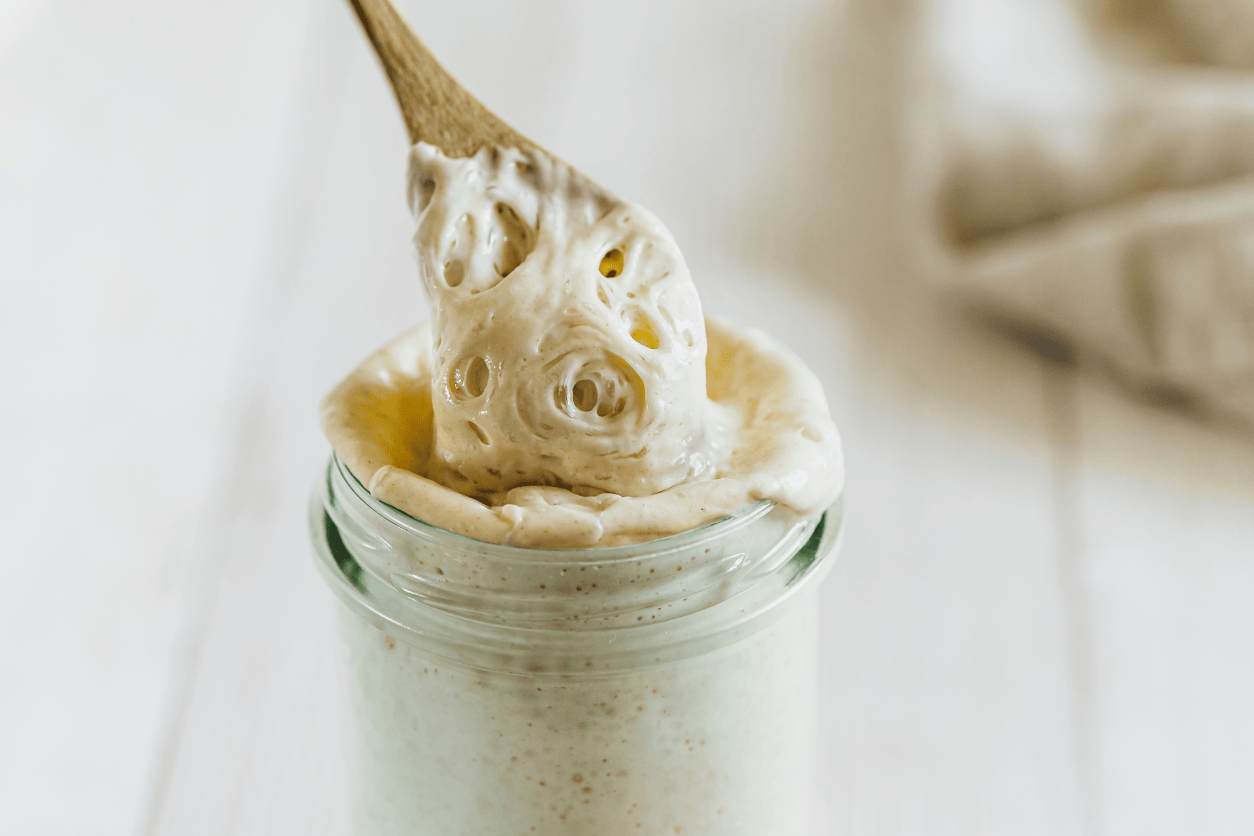
You will also need a non-reactive container, such as a mason jar, along with a rubber spatula for mixing. I prefer a jar with a loose covering—like a piece of foil—so that air circulates freely, inviting wild yeast into your mixture. These simple tools and ingredients form the foundation for a thriving starter. With the right setup, you can embrace the process and watch your starter develop its unique personality over the coming days.
How to Make a Sourdough Starter
Start by measuring equal parts of organic flour and filtered water. For instance, use 50 grams of each. As Zoë puts it, “We are just going to mix together equal parts organic flour… and filtered water.” Now, stir the ingredients until the mixture is smooth and free of dry patches, making sure that every bit of flour is properly hydrated.
Now, cover the jar with a loosely fitted piece of foil. This allows fresh air in and creates an ideal environment for the natural yeasts to settle in. I leave the jar at room temperature for about two days. During this period, the simple combination of flour and water starts to attract wild yeast from the environment—a process that can take anywhere from seven days to two weeks, depending on the conditions. Zoë reminds us, “Don’t get discouraged if this takes more than a week,” because the starter’s progress varies with the temperature, the type of flour, and even the mood of the starter itself.
After the initial rest, feed the starter by discarding a portion and adding fresh flour and water in the same 1:1 ratio. This feeding routine not only nurtures the yeast but also keeps the starter’s volume manageable. Stir the mixture well each time to maintain a uniform consistency. Every feeding session brings new signs of life—tiny bubbles and slight rises that signal the fermentation process kicking into gear.
Daily Feeding and Observation
Every day, take a moment to observe the sourdough starter. The visual cues help determine whether it needs extra care or a slight adjustment. On day three, for example, you might notice that the starter has started to bubble lightly. Zoë recalls, “I just came home from the gym and couldn’t quite believe how much it had risen already.” Such moments indicate that the process is on the right track.
Continue feeding the starter daily by removing a portion and replenishing it with fresh flour and water. Remain consistent with the 50-gram measure to keep the ratio balanced. If you see any water separating at the top, stir it back in, which helps maintain an even texture. This practice ensures that all parts of the starter receive the nourishment they need to develop robust yeast colonies. Keep notes on the starter’s behavior, observing changes in its aroma, texture, and volume. Every day offers clues about the health of the culture, and even subtle differences can be significant.
At times, the starter might seem sluggish or less active. In these moments, mix it thoroughly to incorporate any settled liquid and then feed it a bit more flour to encourage activity. Patience plays a key role here, as the starter responds to its environment at its own pace. Each bubble, each rise, signals progress and growth. This daily ritual transforms the process into a delightful experiment where you learn more about the living organism you’re cultivating.
How to Fix Common Sourdough Starter Issues
Not every batch of sourdough starter behaves as expected. There are times when you might see unusual signs, like a layer of liquid on top or a dense, sludgy consistency at the bottom. These variations are normal and indicate that adjustments are needed. When you notice separation in the starter, take immediate action—stir it well and sometimes increase the flour ratio slightly. Zoë notes, “If you have liquids separating out, you can typically add a little more flour than water in the next feeding.”
Sometimes, the starter appears less bubbly than anticipated. This could mean that the yeast is still acclimating to the environment. Feed it as scheduled, trusting that consistency will yield results. you might also encounter a starter that doesn’t seem excited by the feeding process. Instead of discarding it, mix it up thoroughly and transfer half of it into a new jar before feeding. This technique often helps revive a lagging starter by giving it a fresh start with balanced ingredients.
If the starter develops a sharp or unpleasant odor, don’t panic. It may simply be adjusting, and a regular feeding schedule usually helps settle the flavors. Rely on your intuition—developed over many trials—to decide when to tweak the feeding ratio or when to simply stir things up. By paying close attention to the texture and aroma, you can troubleshoot issues before they become problematic. Each setback offers a learning opportunity and deepens your understanding of this fascinating living culture.
How to Adjust Your Recipe with Different Flour Types and Water Considerations
As your sourdough starter evolves, you might experiment with different types of flour. While organic all-purpose flour is a great starting point, adding whole wheat or rye flour can enhance the starter’s flavor and vigor. Zoë mentions, “Sometimes if you have a lagging starter… adding a little bit of whole grain flour can actually help.” Mixing flours not only introduces new nutrients for the yeast but also adds complexity to the final sourdough flavor.
Water quality plays an equally important role. Filtered water remains the best choice because it lacks the chlorine and chemicals found in tap water. These chemicals can inhibit yeast activity and make it harder for your starter to develop. Stick to the practice of using equal parts water and flour, but remain flexible. If you observe too much separation or a very watery consistency, reduce the water slightly in subsequent feedings.
Adjustments like these come with experience and careful observation. Document each change, noting how the starter reacts to different flours and water ratios. This iterative process allows you to refine the recipe until you achieve the desired balance of activity and flavor.
A Personal Take on Nurturing Your Starter
Working with a sourdough starter feels like nurturing a living pet. I’ve learned that a hands-on approach and daily engagement make all the difference. I often remind myself, as Zoë wisely puts it, “This is a living experiment, so just keep feeding them, keep caring for them, and they will come together.” When I notice even the tiniest signs of activity, like small bubbles or a slight rise, I feel a surge of excitement that validates my efforts.
In my early experiments, I encountered batches that defied expectations—a starter that rose unexpectedly high one day or one that needed an extra boost of flour on another. I take these moments as opportunities to learn and adjust. I now view each feeding as a conversation with my starter, where I listen to its signals and respond accordingly. The process has taught me patience and has made baking an even more rewarding experience.
Our Recipe for Trust: Why Choose Kitchen Institute
At the Kitchen Institute, we're dedicated to providing reliable and accurate information on cooking trends, tips, and product reviews. Our team of passionate food enthusiasts ensures that every piece of content is thoroughly researched and based on real-world experience. We pride ourselves on our comprehensive and unbiased product reviews, rigorous research processes, and commitment to staying current with the latest culinary innovations. Trust us to enhance your culinary journey with quality insights and practical advice.